Nix的使用记录
前言 接下来你能看到的 Nixos的安装 Nixos 在surface上的使用 Nixos 配置hemes agent 与 Napcat 杂碎 社团的pve创建LXC容器时总会解析不到默认路由 暂时添加 Nixos安装 …
前言
接下来你能看到的
- Nixos的安装
- Nixos 在surface上的使用
- Nixos 配置hemes agent 与 Napcat
杂碎
-
社团的pve创建LXC容器时总会解析不到默认路由 暂时添加
ip route add default via 192.168.10.1
Nixos安装
本地安装详见surface篇
虚拟机
图像化界面创建好虚拟机,安装安装引导提示即可
手动安装的部分已删除 ,参考虚拟机安装 | NixOS 中文
lxc容器
准备
请到Hydra - nixos:release-25.11 下载为LXC准备的iso导入PVE
PVE后台创建LXC容器
开机后
无法登入是正常的
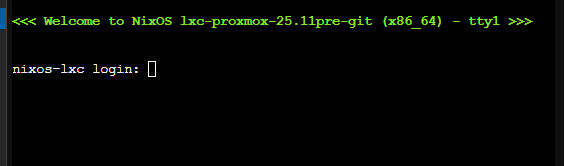
请进入pve Shell,
pct enter 122 #我的lxc容器序号为122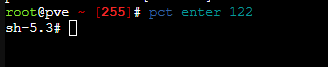
进入shell后发现 ls等 基础命令无法使用,需要激活环境变量,后更改密码
source /etc/set-environment
passwd
重启一下122号lxc容器,登入即可
直接抄配置就好Proxmox Linux Container - NixOS Wiki
{ config, modulesPath, pkgs, lib, ... }:
{
  imports = [ (modulesPath + "/virtualisation/proxmox-lxc.nix") ];
  nix.settings = { sandbox = false; };
  proxmoxLXC = {
    manageNetwork = false;
    privileged = true;
  };
  services.fstrim.enable = false; # Let Proxmox host handle fstrim
  services.openssh = {
    enable = true;
    openFirewall = true;
    settings = {
        PermitRootLogin = "yes";
        PasswordAuthentication = true;
        PermitEmptyPasswords = "yes";
    };
  };
  # Cache DNS lookups to improve performance
  services.resolved = {
    extraConfig = ''
      Cache=true
      CacheFromLocalhost=true
    '';
  };
  system.stateVersion = "25.05";
}
nix-channel --update
nixos-rebuild switch --upgrade你应该会遇到文件系统报错
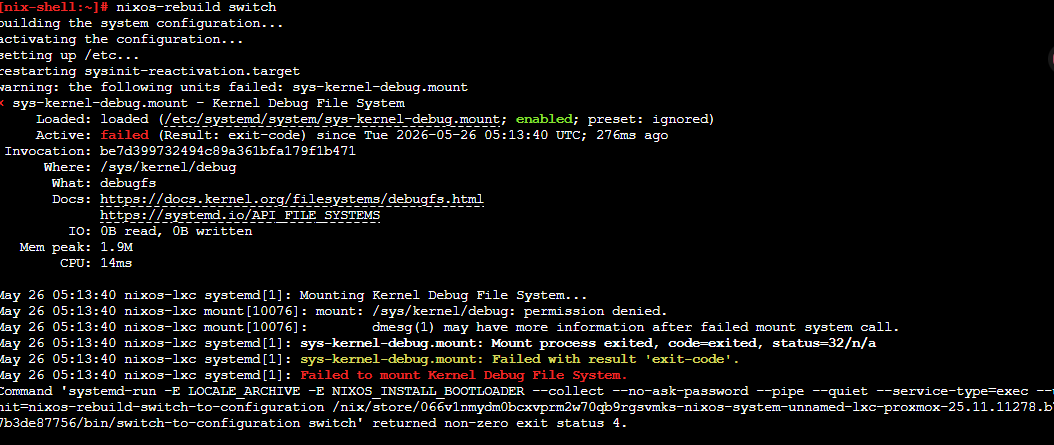
把configration.nix改为以下配置
{ config, modulesPath, pkgs, lib, ... }:
{
  imports = [ (modulesPath + "/virtualisation/proxmox-lxc.nix") ];

  systemd.mounts = [
    { where = "/sys/kernel/debug"; enable = false; }
    { where = "/sys/fs/fuse/connections"; enable = false; }
  ];

  systemd.services."sys-kernel-debug.mount".enable = false;

  nix.settings = { sandbox = false; };
  proxmoxLXC = {
    manageNetwork = false;
    privileged = true;
  };

  services.fstrim.enable = false; # Let Proxmox host handle fstrim
  services.openssh = {
    enable = true;
    openFirewall = true;
    settings = {
        PermitRootLogin = "yes";
        PasswordAuthentication = true;
        PermitEmptyPasswords = "yes";
    };
  };

  # 用户配置,我只用root就不加了
  #users.users.pain11 = {  # pain11 替换你的用户名
  #  isNormalUser = true;
  #  extraGroups = [ "wheel" "networkmanager" ] ;
  # 初始密码(仅第一次生效),登入后使用passwd修改
  #  initialPassword = "password123";
  #};

  # Cache DNS lookups to improve performance
  services.resolved = {
    extraConfig = ''
      Cache=true
      CacheFromLocalhost=true
    '';
  };
  system.stateVersion = "25.05";
}
nix-channel --update
nixos-rebuild switch大工告成了,接下就是正常使用nixos的步骤
Flake在WSL下的复现
hauiyri
Hermes agent 与 Napcat
缓存服务器使用
插入
password如果包含 ~、_、]、%、!、,、`、| 等 , 貌似会有问题
mc admin user add s3 nixbuilder password # password如果包含 ~、_、]、%、!、,、`、| 等 , 貌似会有问题正文
接下来都是在客户端nixos配置
生成密码
nix run nixpkgs#pwgen -- -c -n -y -s -B 32 1
#  %R)j;vys4t{N~CyocWy_i_U</{p]-!z4
#  E~_]UoqjH=N%UH!xu,k.ww`VovgfLL|3
安装minio-client
{ config, lib, pkgs, ... }:

{
  environment.systemPackages = with pkgs; [
    minio-client
  ];
}
创建~/.mc/config.json
{
  "version": "10",
  "aliases": {
    "s3": {
      "url": "http://192.168.10.32:9000",
      "accessKey": "minioadmin",
      "secretKey": "minioadmin",
      "api": "s3v4",
      "path": "auto"
    }
  }
}
配置S3的凭据,创建~/.aws/credentials。使用我们刚刚pwgen生成的密码
[nixbuilder]
aws_access_key_id=nixbuilder
aws_secret_access_key=%R)j;vys4t{N~CyocWy_i_U</{p]-!z4
在nixos上,创建存储桶nixos-cache
mc mb s3/nix-cache创建用户 nixbuilder 并设置密码
mc admin user add s3 nixbuilder password #password替换为pwgen生成的在当前目录创建 nix-cache-write.json
{
  "Id": "AuthenticatedWrite",
  "Version": "2012-10-17",
  "Statement": [
    {
      "Sid": "AuthenticatedWrite",
      "Action": [
        "s3:AbortMultipartUpload",
        "s3:GetBucketLocation",
        "s3:GetObject",
        "s3:ListBucket",
        "s3:ListBucketMultipartUploads",
        "s3:ListMultipartUploadParts",
        "s3:PutObject"
      ],
      "Effect": "Allow",
      "Resource": ["arn:aws:s3:::nix-cache", "arn:aws:s3:::nix-cache/*"],
      # "Principal": "nixbuilder"
    }
  ]
}
使用刚刚的 nix-cache-write.json 创建上传的策略
mc admin policy create s3 nix-cache-write nix-cache-write.json关联到创建的用户 nixbuilder
mc admin policy attach s3 nix-cache-write --user nixbuilder验证一下
mc admin user info s3 nixbuilder

root@nixos ~# mc admin user info s3 nixbuilder
AccessKey: nixbuilder
Status: enabled
PolicyName: nix-cache-write
MemberOf: []
允许未身份认证的用户下载文件
mc anonymous set download s3/nix-cache添加 nix-cache-info 到S3存储桶的目录
StoreDir: /nix/store
WantMassQuery: 1
Priority: 40
mc cp ./nix-cache-info s3/nix-cache/nix-cache-info接下来生成对钥,用于校验数据来源和完整性
nix key generate-secret --key-name debian-minio > ~/.config/nix/secret.key
nix key convert-secret-to-public < ~/.config/nix/secret.key > ~/.config/nix/public.key
cat ~/.config/nix/public.key
# debian-minio:6Xlh7HlmWgPuqb3JCiMwNy3FphzuQIgg6/lhLEaMd6o=
把以下放入nixos配置模块中,已使用s3存储桶的缓存
  nix = {
    settings = {
      extra-substituters = [
        "http://192.168.10.32:9000/nix-cache/"
      ];
      extra-trusted-public-keys = [
        "debian-minio:6Xlh7HlmWgPuqb3JCiMwNy3FphzuQIgg6/lhLEaMd6o="
      ];
    };
  };
重构一下系统
nixos-rebuild switch 接下来,把本地的缓存签名
nix store sign --recursive --key-file ~/.config/nix/secret.key /run/current-system上传
nix copy -v --to 's3://nix-cache?profile=surface&endpoint=http://192.168.10.32:9000&scheme=http' /run/current-system踩坑
配置这一步时填错了地址
  nix = {
    settings = {
      extra-substituters = [
        "http://192.168.10.32:9000/nix-cache/"
      ];
      extra-trusted-public-keys = [
        "debian-minio:6Xlh7HlmWgPuqb3JCiMwNy3FphzuQIgg6/lhLEaMd6o="
      ];
    };
  };
喜迎报错
bob in 🌐 nixos in nixos on main took 4s ❯ sudo nixos-rebuild switch --flake /home/bob/nixos/
warning: error: unable to download 'http://192.168.10.123:9000/nix-cache/nix-cache-info': Timeout was reached (28) Connection timed out after 15002 milliseconds; retrying in 262 ms
warning: error: unable to download 'http://192.168.10.123:9000/nix-cache/nix-cache-info': Timeout was reached (28) Connection timed out after 15001 milliseconds; retrying in 688 ms
warning: error: unable to download 'http://192.168.10.123:9000/nix-cache/nix-cache-info': Timeout was reached (28) Connection timed out after 15002 milliseconds; retrying in 1084 ms
warning: error: unable to download 'http://192.168.10.123:9000/nix-cache/nix-cache-info': Timeout was reached (28) Connection timed out after 15001 milliseconds; retrying in 2176 ms
warning: unable to download 'http://192.168.10.123:9000/nix-cache/nix-cache-info': Timeout was reached (28) Connection timed out after 15001 milliseconds
error:
… while decoding key named 'debian-minio' with raw value 'debian-minio:6Xlh7HlmWgPuqb3JCiMwNy3FphzuQIgg6/lhLEaMd6o='
error: invalid character in Base64 string: ''
Command 'nix --extra-experimental-features 'nix-command flakes' build --print-out-paths '/home/bob/nixos/#nixosConfigurations."nixos".config.system.build.nixos-rebuild' --no-link' returned non-zero exit status 1.这个错误主要在与错误的公钥被硬编译了
查看声明的/etc/nix/nix.config , 果不其然 😕
extra-substituters = http://192.168.10.123:9000/nix-cache/
extra-trusted-public-keys = debian-minio:debian-minio:6Xlh7HlmWgPuqb3JCiMwNy3FphzuQIgg6/lhLEaMd6o=
因为已经声明了,所以你是不能修改 /etc/nix/nix.config 的
先尝试回退先前构建的环境
ls /nix/var/nix/profiles
sudo nix-env --list-generations --profile /nix/var/nix/profiles/system
46 2026-04-16 23:06:54
47 2026-05-31 14:04:39
48 2026-05-31 14:11:10
49 2026-05-31 14:49:44 (current)
50 2026-05-31 17:45:37回退到49号版本
sudo nix-env --switch-generation 49 --profile /nix/var/nix/profiles/system于是干了一件很纯的事 🐷 ,
这导致 Nix 重新评估所有依赖,重新下载/编译必要的包
sudo rm -rf /etc/nix/nix.config于是就有了,不过也是方法 1
[1/239/10212 built, 567.2 MiB DL] building gfortran-14.3.0 (buildPhase): g++ -std=c++11 -fno-PIE其实可以忽略公钥的签名认证,方法 2
# 完全禁用签名验证(仅测试用)
sudo nixos-rebuild switch --flake /home/bob/nixos/ \
  --option require-sigs false \
  --option trusted-public-keys ""
参考
Proxmox Linux 容器 - NixOS 维基 — Proxmox Linux Container - NixOS Wiki
原始笔记:linux/使用nix的记录.md